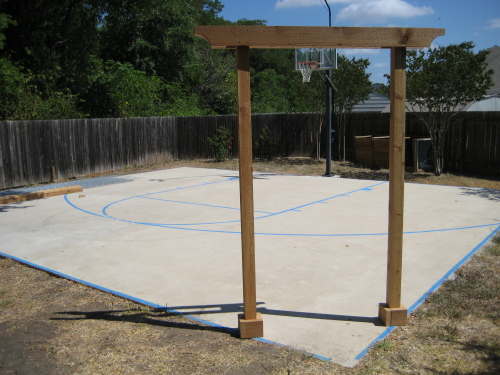
The starting point for my “Court”-Yard Garden project is an arbor entry gate placed diagonally across one of the corners of the court. All the other fencing, raised beds, and trellises around the outside edge of the court will flow outwards from this entry. My plan was to install the arbor and add the gate a little later after a few of the trellises and fence sections were attached for added stability.
The Finished Product
Here’s a look at the completed arbor entry.

What You Need
– ( 2 ) 4”x 4” x 8’ cedar posts
– ( 1 ) 2” x 6” x 16’ cedar plank
– ( 2 ) 4” x 4” standoff post bases
– ( 2 ) ½” x 3” concrete wedge anchor bolts
– hammer drill
– ½” diameter carbide tip masonry drill bit
– jigsaw
– socket wrench
– shop vac
– hammer
– level
– nails
– deck screws
Determine Placement
You need to determine where you want your two vertical posts to be located, and how much space you want between them. If you are going to add a gate, be sure to allow clearance for the gate to open. I spaced my two posts 48” on center. This seemed to be a pretty standard gate width for fence gates and should allow enough room for a wheelbarrow to pass through.
Mark the Post Base Location
Once you have determined where you want your vertical posts to be, place the two standoff post bases on the concrete precisely where you want them to be located. Once they are bolted to the concrete they cannot be moved so check your measurements again just to be sure.
Use a carpenter’s pencil to outline on the concrete where the hole in the center of the standoff post anchor is located. Move the standoff post base out of the way.
Drill the Holes
A hammer drill with a high quality carbide tip masonry drill bit is highly recommended for drilling the holes. I started off trying to use a standard drill with an inexpensive masonry bit but barely made a dent in the concrete. You will want to use a bit that is the same diameter as the anchor bolt, and drill the holes ¼” deeper than the length of the anchor bolt. My anchor bolts were 3” long so I drilled my holes 3 ¼” deep.
Now drill the holes. When you first start to drill, be sure to keep the bit exactly on your mark as the spinning action of the bit will tend to move you slightly off your mark. As you drill, pull the bit almost all the way out of the hole every few seconds to get the concrete dust out of the hole. You may want to stop a few times during the drilling and use the shop vac to remove the concrete dust from the hole. It also gives you a chance to take a quick break from drilling. Continue drilling until your holes have reached the desired depth.
Mount the Post Bases
Once your holes are drilled, use the shop vac to remove all of the concrete dust from the hole and the work area. One end of the concrete wedge anchor bolt is threaded, and the other end is smooth. The threaded end needs to be the end that sticks up out of the hole. Place the smooth end of the wedge anchor bolt into the hole, and hammer the bolt in until only about ½” is sticking up. Place a standoff post base over the threaded end of each of the wedge anchor bolts. Be sure to align them with your placement marks and make them parallel with each other. Place a washer and then a nut on each anchor bolt and tighten with a socket wrench. As you tighten the nut, the anchor on the bottom of the wedge bolt will expand and lock the fixture in place.
Mount the Posts
You will need a helper for this part of the project. Place the end of a 4” x 4” post firmly into a post base and level the post on both planes. Have your helper hold the post level while you drive three nails into each side of the post base. Repeat for the second post.
Add the Cross Pieces
Measure the distance between the outside edges of the two posts and add 2’ to this measurement. This is the length to cut your cross pieces to allow for each cross piece to extend 1’ beyond each post. Cut the 2” x 6” plank into two equal pieces using the length you just determined. Use the bottom of a bucket to trace the curve on each end of the cross pieces and cut along this line with a jig saw. Use deck screws to fasten each cross piece to the top of the posts being sure to keep them level and have the ends extending equal distances from the posts.
Add Accent Pieces
Use some of the scrap 2” x 6” board to cut baseboards to wrap around the bottom of each post.
Summary
You now have an attractive arbor entry. I’ll go over adding a gate in a future post. It looks like I’m all in on this project as the arbor entry makes it a little difficult to play basketball now. I’ll keep you posted on the next steps in the project.

