
Article first published as Use raised garden beds to battle deer, dirt, by Rick Bickling, in The Liberty Hill Independent.
Here in Central Texas, March 15th is the proverbial “D-Day” of the gardening world, as it marks our official “Last Freeze Date.” This date was not mystically divined from a few magic tealeaves by a fortuneteller, nor have the folks in Washington proclaimed it as the law of the land. Not even the Weather Czar, if there is such a person, had anything to do with it.
To find the Last Freeze Date for your area, check out our handy Frost and Freeze Date Tool in the How Do Gardener Tool Shed.
The Last Freeze Date for a given area is based on historical weather data from that area, collected over a 30-year period. The actual dates that freezing temperatures occurred in that area are averaged together, and statistical probabilities of a freeze occurring are then assigned to every day of the year. For us, March 15th is the date that there is only a 10 percent chance of a freeze occurring. Remember, although statistically accurate, you are really just playing the odds with this date. Before planting you should ALWAYS check your local weather to see if a freeze is in the forecast.
Two other “D” words that are usually not looked upon with the same enthusiasm around here when we talk about gardening are the ever-hungry deer, and our rock filled dirt. We all know how it works. If you spend enough time with a pick axe, hacking away at the ground, are able to remove all of the rocks, and can actually find enough soil to plant a garden in, the deer will probably eat everything if a late season freeze doesn’t kill it all first.
One of the best ways to combat the deer, the dirt, and freezing temperatures, while optimizing your available garden space, is with the use of raised garden beds. Rather than trying to dig down into the existing soil, raised beds allow you to garden on top of our rocky soil by adding your own soil mixture into a bed placed on top of the ground.
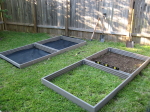
Build the Beds
Each raised bed is 4 feet wide by 4 feet long and only 6 inches deep. Keeping the beds no wider than 4 feet makes it easy to reach anywhere in the raised bed. I construct each one out of a single 16-foot long by 6-inch wide composite decking plank (around $29) cut into four equal length pieces and screwed together at each corner. Avoid pressure treated lumber due to the chemicals it contains. If you want to save a little money up front, you can use plain untreated 2-inch by 6-inch lumber, knowing that it will rot and need to be replaced in about five years. You can always paint only the outside surfaces of the completed untreated lumber beds to add a little color to your garden.

The Soil
You may be wondering how you could ever grow vegetables in only 6 inches of soil. The answer lies in a technique called “Square Foot Gardening” developed by Mel Bartholomew. This technique allows you to grow your garden in only 20% of the space typically needed for a traditional row garden.
The key component of “Square Foot Gardening” in your raised beds is the soil. Rather than trying to weed, till, and amend the existing soil in your yard, you will make our own custom mixture. This mixture, called “Mel’s mix,” consists of one-third coarse vermiculite, one-third peat moss, and one-third compost. It is this soil that allows you to grow your vegetables in only a 6-inch deep bed.
The components are measured by volume in cubic feet. Each 4-foot by 4-foot bed requires 8 cubic feet of soil. Try to use several different types of compost to make up the compost portion of your soil mix. Different compost brands are derived from different sources such as chicken waste or cow waste. Once you have your components, lay a tarp on the ground near your raised beds, dump your ingredients on it and mix thoroughly. Once mixed, fill your bed(s).
Drip Irrigation Grid

I decided to install and use a Rain Water Harvesting System, discussed in detail in a future article, to connect to my Drip Irrigation System. A garden hose from an outdoor faucet will work just fine but be sure to install a Pressure Regulator.
Grow Vertically
Many vegetables such as pole beans, peas, cantaloupe, and even tomatoes can be grown on a vertical trellis made out of one-half inch electrical conduit and nylon trellis netting. I made mine 6 feet high and 4 feet wide. Drive a piece of one-half inch rebar that is about 18? to 24? long halfway into the ground at each of the two corners where the trellis will be placed. Then just slip the conduit over each piece of rebar to hold the trellis in place.
The electrical conduit comes in 10? lengths (around $2 each) and your local home improvement store can cut it to the desired length. The nylon trellis netting can also be found at your local home improvement store or garden center.
Keep the Deer Out
Finally, create a structural framework to support either deer netting, or protective mesh plant fabric using two 10’ lengths of one-half inch diameter PVC pipe for each bed. Just stick one end of the PVC pipe in the soil on the inside corner of a raised bed, arch the pipe over top of the bed diagonally, and stick the other end of the pipe in the soil on the opposite side of the bed. Repeat this step with another PVC pipe, arched diagonally between the other two corners of the raised bed and tie them together where they cross at the top. Now deer netting can be draped over the top of this structure and anchored to the ground just outside each raised bed with stakes, a few old bricks, or some scrap lumber. If cold weather threatens, replace the deer netting with row cover fabric to protect the plants from frost or freeze damage.
Check out the book All New Square Foot Gardening: Grow More in Less Space!
by Mel Bartholomew for specific information on the the number of each type of vegetable to plant per square and other great information.
So there you have it. A great way to battle the deer, the dirt, and late spring freezes, while growing a lot in a small space. Raised beds do cost more up front but, once installed, will more than pay for themselves by increasing your crop yields for years to come. Try a raised bed or two this season and see for yourself.